Máy tính của bạn khi khởi động không lên được, và yêu cầu Chmod lại
thời gian thì mới bắt đầu vào được Windows. Ngoải ra khi ào trình duyệt
thậm chí thời gian sai cũng không thể truy cập được một số hoặc toàn bộ
các trang web. Biểu hiện ở đây là bạn nhận được thông báo lỗi
System CMOS checksum bad – Default configuration used , và yêu cầu phải chỉnh lại thời gian để khởi động.
Chú ý : Hầu hết phần mềm đều dùng mạng internet để đồng bộ với hệ thống server vì thế bạn có thể tham khảo việc
lắp đặt cáp quang FPT để phần mềm hoạt động tốt
 Nguyên nhân :
Nguyên nhân của việc này xuất phát từ việc máy tính của bạn sai thời
gian, thường là về thời gian mặc định lúc máy được sản xuất hoặc xuất
xưởng. Và nguyên nhân của việc thời gian sai thì xuất phát từ việc viên
pin Chmod của bạn đã cạn kiệt hoặc do lỗi BIOS … và nhiều nguyên nhân
khác.
Cách khắc phục phần cứng :
Bạn cần sử dụng viên pin CHmod khác thay thế, viên pin này bạn có thể
mua ở ngoài tiệm máy vi tính, hoặc nhờ cửa hàng máy tính thay hộ.
Xem thêm :
Cách khắc phục bằng phần mềm
Tốt nhất là bạn nên thay pin, khi thay pin mà không được thì bạn mới
nên sử dụng phần mềm,. Việc cài cả một phần mềm dù nhẹ đến mấy nhưng cho
một việc mà mặc định nó vốn có là hơi thừa. Tuy nhiên có nhiều nguyên
nhân khác nhau có thể làm mất thời gian máy tính, vì thế nếu chi phí sửa
lớn, hoặc không sửa được thì bạn hãy nghĩ đến việc sử dụng danh sách
phần mềm mà chúng tôi giới thiệu tại đây, chúng rất là nhẹ nhàng , không
ảnh hưởng nhiều đến hệ thống.
Phần mềm số 1 . Dimension 4
Dimension 4 là phần mềm được nhiều người sử dụng vói chức năng cài
đặt thời gian cho hệ thống máy tính. Nó miễn phí với người dùng bình
thường ( như bạn, như tôi ) và có phí với những doanh nghiệp ( như công
ty của tôi ) và giá của nó là 10$ . Phần mềm sẽ tự động cài đặt thời
gian và máy tính của bạn khi máy tính khởi động. cài đặt hệ thống đồng
bộ thời gian với máy tính của bạn và tự động thoát khi nó hoàn thành
nhiệm vụ. Tức là nó chỉ hoạt động vào thời gian đầu và làm đúng chức
năng nhiệm vụ là cài đặt thời gian vào máy tính của bạn, sau khi đồng bộ
xong thì nó nghỉ. Tránh ảnh hưởng đến hiệu năng máy tính của bạn.
Xem thêm :
Doanh nghiệp nên dùng gói cước cáp quang FPT nào tốt nhất
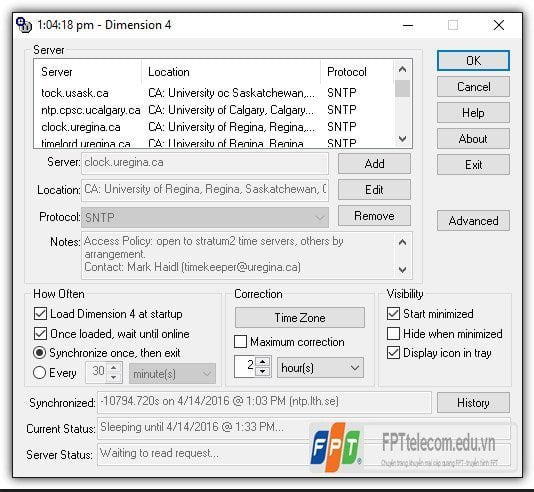
Nếu bạn muốn Dimension 4 tự động hoàn toàn khâu đồng bộ thời gian cho
máy tính của bạn khi khởi động, bạn có thể cần làm một số seting ( 1
lần và mãi mãi ) như sau. Đầu tiên bạn mở phần mềm, chọn Settings từ
chương trình, sau đó bật ( Enable ) những tick trong vùng How Offen như
hình ở trên.Tức là bạn check vào mục
- Load Dimension 4 at startup
- Once loaded, wait until online
- Synchronize once, then exit
Download phần mềm
dimension4
Phần mềm số 2. Time-Sync
Time-Sync , đúng là nghe tên đã hiểu nó chức năng nhiệm vụ và quyền
hạn của đồng chí này, đây là phần mềm cài đặt hệ thống thời gian dành
cho thiết bị máy tính Windows. Với phần mềm, bạn sẽ chỉ cần cài đặt và
chỉnh sửa một chút về thời gian là phần mềm hoạt động. Ngoài ra phần mềm
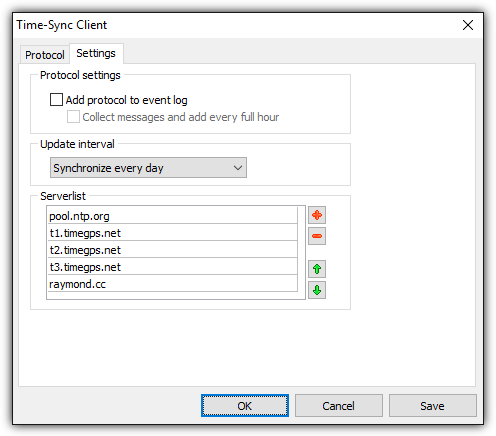
này hoàn toàn miễn phí, bạn cứ thế sài thôi. Bạn cần cài đăt phần
mềm Time-Sync, theo mặc định cấu hình phần mềm này sẽ tự động khởi động
cùng máy tính ( mở lúc bật máy tính ) và tự động đồng bộ thời gian cho
máy tính của bạn.Tuy nhiên, theo mình biết thì phần mềm này tự động lấy
thời gian từ hệ thống của nó ( server ) nên cần có kết nối internet . Nó
hỗ trợ tới 5 server ( quá khủng cho chức năng thời gian ), bạn có thể
tham khảo
gói cước combo cáp quang FPT và truyền hình FPT để có mạng internet tốt nhất dùng cho nhiều việc khác nhau như học tập, giải trí, làm việc…
Tuy nhiên, phần mềm này không tự động kết thúc cuộc chơi khi hoàn
thành nhiệm vụ. Như phần mềm số 1 mà tôi giới thiệu ở trên thì nó tự
động exit khi hoàn thành , tuy nhiên phần mềm Time-Sync này lại chạy
ngầm, và thực ra nó cũng chỉ tốn 532Kb dung lượng. Và với dung lượng này
thì thực sự không đáng là gì , bạn hoàn toàn có thể thoải mái cho nó
chạy.
Download Time-Sync
Phần mềm số 3 Neutron
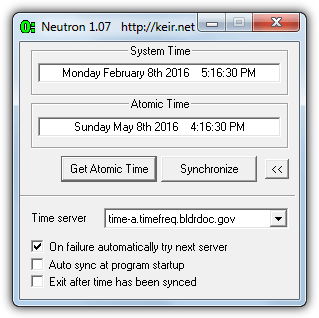
Nếu bạn cần một phần mềm hoạt động hoàn hảo cho việc đồng bộ thời
gian, tự động cài đặt thời gian khi khởi động máy tính thì Neutron là
một phần mềm dành cho bạn, với dung dương siêu nhỏ khoảng 10KB, một dạng
phần mềm hoạt động luôn không cần cài đặt, Phần mềm này tự động đồng bộ
thời gian từ Server nếu không đồng bộ được phần mềm cũng sẽ tự động cài
đặt được thời gian cho bạn. Theo thuật toán của họ. Phần mềm được xuất
bản từ những năm 2008, hiện nay không thấy cập nhật thêm nhưng nó vẫn
hoạt động rất tốt.
If you prefer a simpler tool that just checks for the current time on
the server and automatically adjusts the clock without too much fuss,
check out Neutron. What makes Neutron stand out is the small file size
(10KB), it’s portable, it automatically retries the next time server
when the current one fails and has the ability to auto sync on startup.
Importantly it can also exit after the time has been synced so nothing
is left running in the background. Neutron’s an old tool dating back to
2008 but still works fine.
Download phần mềm
Neutron
Trên đây, chúng tôi đã gửi đến bạn đọc danh sách một số phần mềm tốt
nhất để bạn có thể tự động cài đặt thời gian cho máy tính chạy Windows.
Có một số phần mềm khác với chức năng khá giống. Tuy nhiên bạn nên sử
dụng danh sách phần mềm chúng tôi giới thiệu bởi đây là phần mềm đã được
kiểm tra, test và hoạt động rất ổn định. Đúng chức năng và không có
quảng cáo ,
https://fpttelecom.net/top-3-phan-mem-tu-dong-cap-nhat-thoi-gian-cho-may-tinh/


